Spatial Crowdsourcing with Toloka Kit

Subscribe to Toloka News
Subscribe to Toloka News
Earlier this year, we launched Toloka Kit – an open-source Python library for data labeling. In this article, we'd like to talk about how Toloka Kit can help you set up a spatial crowdsourcing project. Whether it's launching field surveys, monitoring prices, sending mystery shoppers to stores, or collecting any kind of data from the physical world, you can count on Toloka Kit to make things easier for you.
What is spatial crowdsourcing?
Today, we will look specifically at field tasks. These tasks are location-based, and performers see them as points on a map. The performer chooses a task and heads over to that location to complete it. The task can be anything from checking business hours of an outlet to assessing the cleanliness of trash containers or installation of advertising materials like signs and billboards. The key is to organize the whole process in a way that leaves no room for ambiguity and inaccuracy.
How to use Toloka Kit for spatial crowdsourcing
For this assignment, let's imagine that performers were asked to take photos of certain metro station entrances in Moscow. This type of urban task is very common. The technical process for a project supervisor will consist of 5 stages listed below. Note that this is a summary. For more detailed instructions, please look here.
- Data preparation
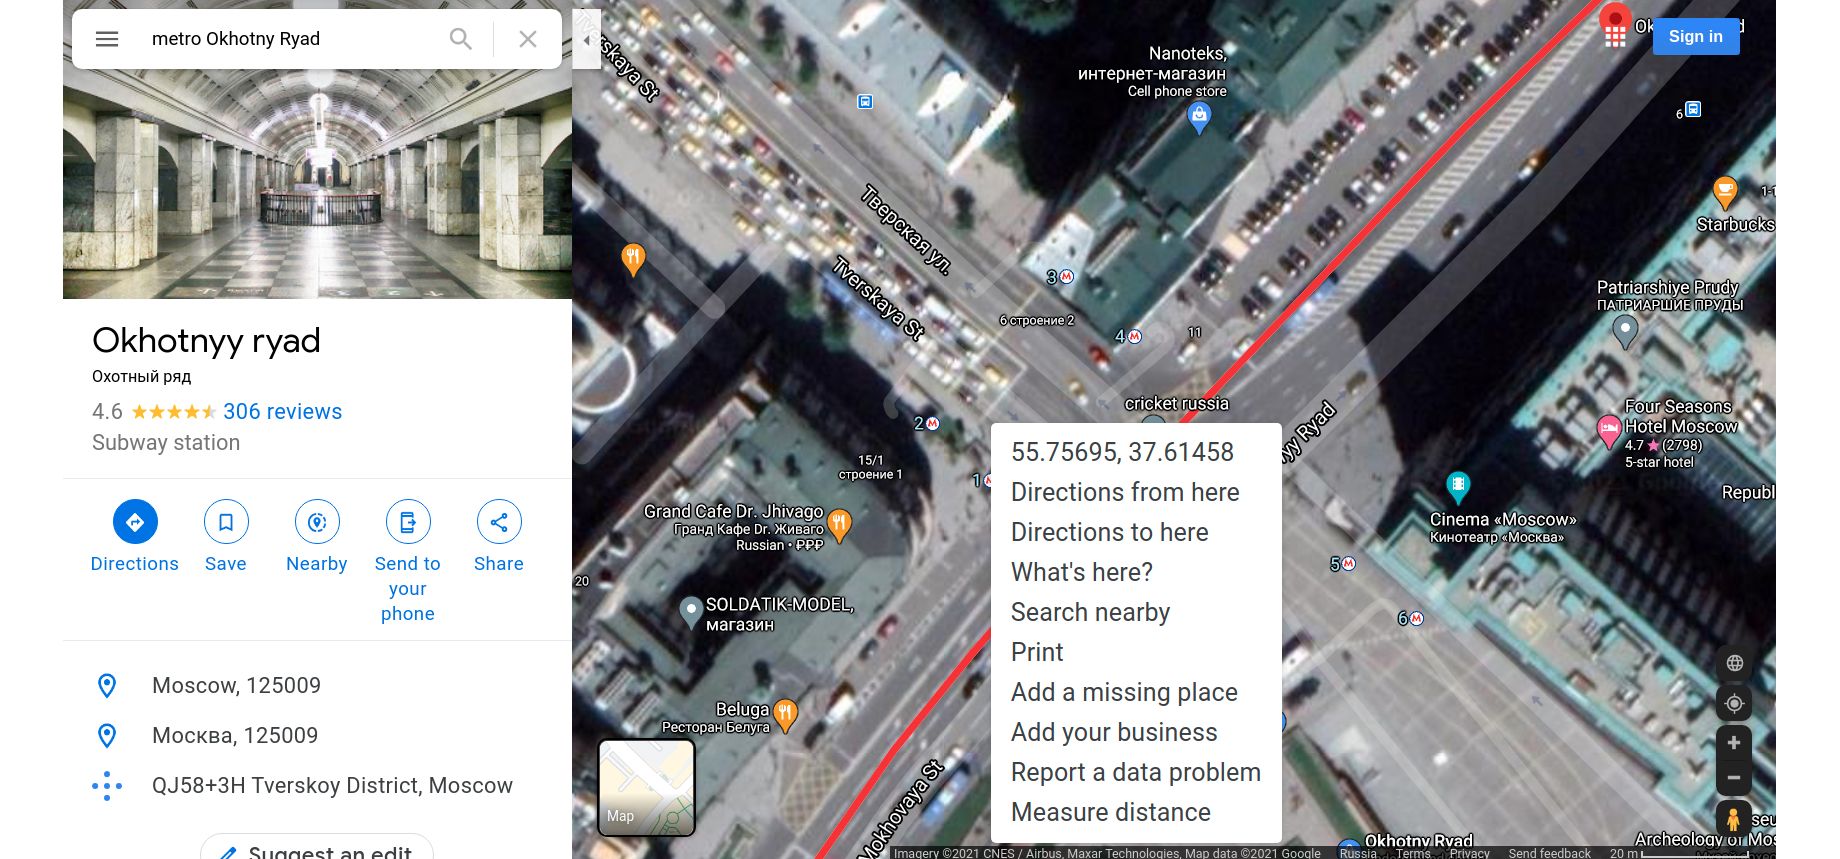
Let's take the Okhotny Ryad metro station. Open a map in Yandex or Google. You can switch to satellite mode as an option.
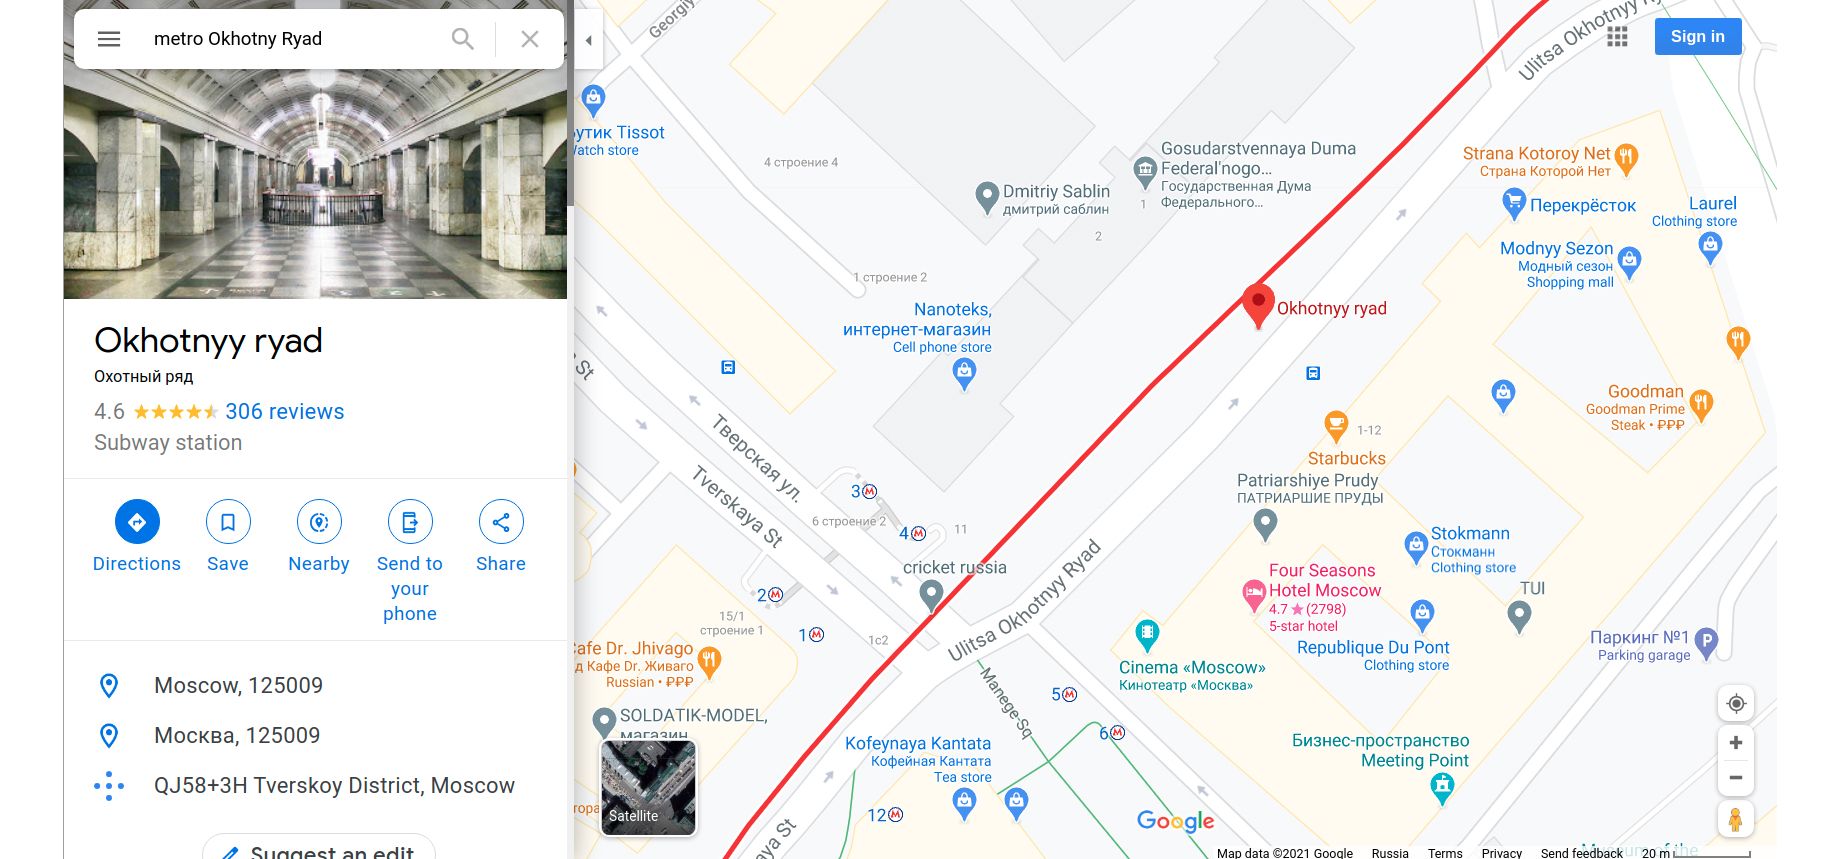
Find the first entrance to the station, which is marked M with number 1 displayed on the left. When on Google, simply right-click on the point. We get: 55.756916, 37.614546. These are latitude and longitude coordinates – you'll need them to set up the project.
- Create a project
There are a number of steps we need to take here:
Set up the environment. To do this, you'll need: Toloka Kit to add the main functionalities of Toloka; IPyPlot to add images in Jupyter Notebook; and Pandas/Numpy for data manipulation.
Create a dataset. To simplify things, we will use an existing dataset of images in this test run. Note that a performer will visit each point only once, so make sure that all of the points are marked very clearly.
Set input and output parameters. As an input, we have [1] coordinates of the entrance, [2] station's name, and [3] entrance number. As an output, we want to get [1] verdict (object found or not), [2] photos of the object, [3] photos of the surrounding area, and [4] coordinates of the performer.

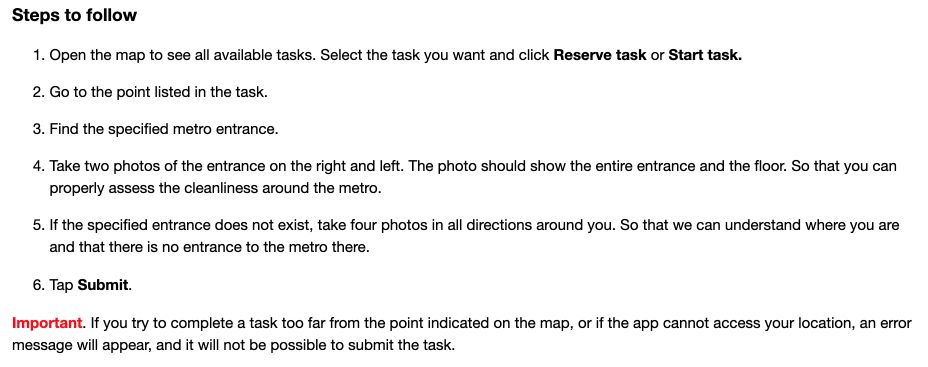
One of the most crucial steps is to put together a list of foolproof instructions for performers! It's always good to start by explaining how to configure a device.

This should be followed by a detailed explanation on how to complete the task. Make sure you also explicitly outline what to do should something go wrong (for example, if no object is seen or there's no/limited access). Also, always provide requirements for images and other relevant information with examples of correct and incorrect submissions.
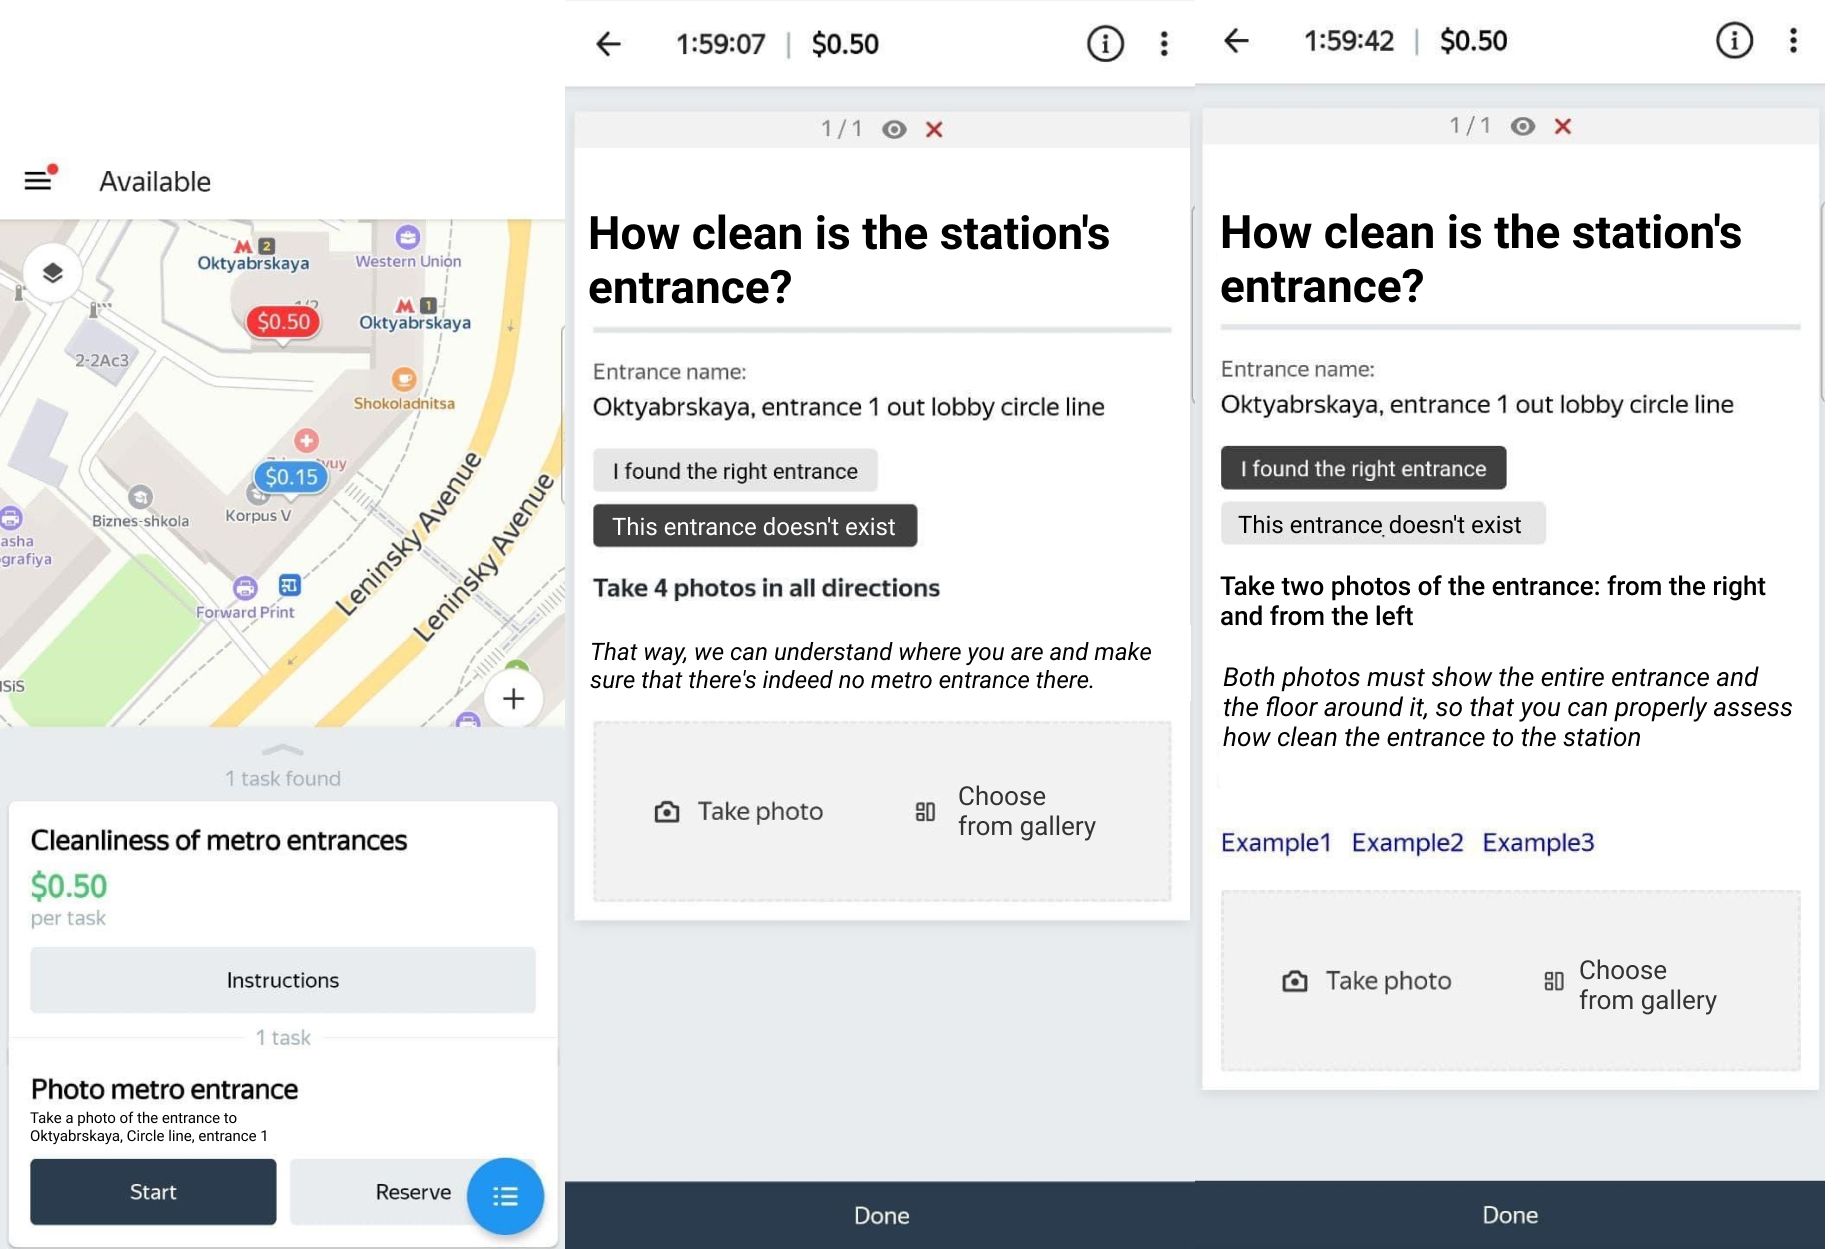
Prepare the interface. To do this, define UI elements of the project using a template builder in Toloka Kit. Subsequently, the performer will see the following:
Finally, create an instance of Project Class and send it to Toloka or Toloka Sandbox. The new project will appear in your requester's account. Perfect!
- Create a pool
Now that we have our project, we need to also create a pool — a collection of tasks sent out to performers. To do this, let's create an instance of Pool Class and again send it to Toloka or Toloka Sandbox. Good, we're almost there.
- Run the pool
Next, let's create instances of TaskSuite Class. You can now add tasks and bind them to map coordinates. All set – let's run the pool!
- Receive and check results
The process of validating field tasks is different from other tasks. We recommend following these 3 rules of thumb:
Always cross-reference object and device coordinates. Also, cross-reference photo submissions with available images – you can use old photos or Yandex/Google maps.
Remember that if the performer did their part, they should be paid regardless of other factors (e.g. the object is inaccessible). Confirm payments accordingly.
Since field tasks usually take a while, you shouldn't wait for the whole pool to be completed. Retrieve submitted tasks and send them for verification while you're still waiting on the others.
Now, get all of the (remaining) unverified tasks from your pool and either accept or reject the assignment. Note that every assignment will be accepted automatically after a certain amount of time, which you need to specify when you are creating a pool. Naturally, you don't need to do the verification yourself – this can also be done through Toloka.
The ball is in your court
As you can see, Toloka Kit allows you to maintain a great deal of control over your crowdsourcing project. It provides you with flexible levers that are absolutely invaluable when you're building a scalable ML pipeline. Spatial crowdsourcing is evidently no exception. We invite you to give this test project a run and see for yourself. Also, we continuously improve and update our library, so you're very welcome to contribute in any way you see fit!
Get Toloka-Kit
Recent articles


Have a data labeling project?
